
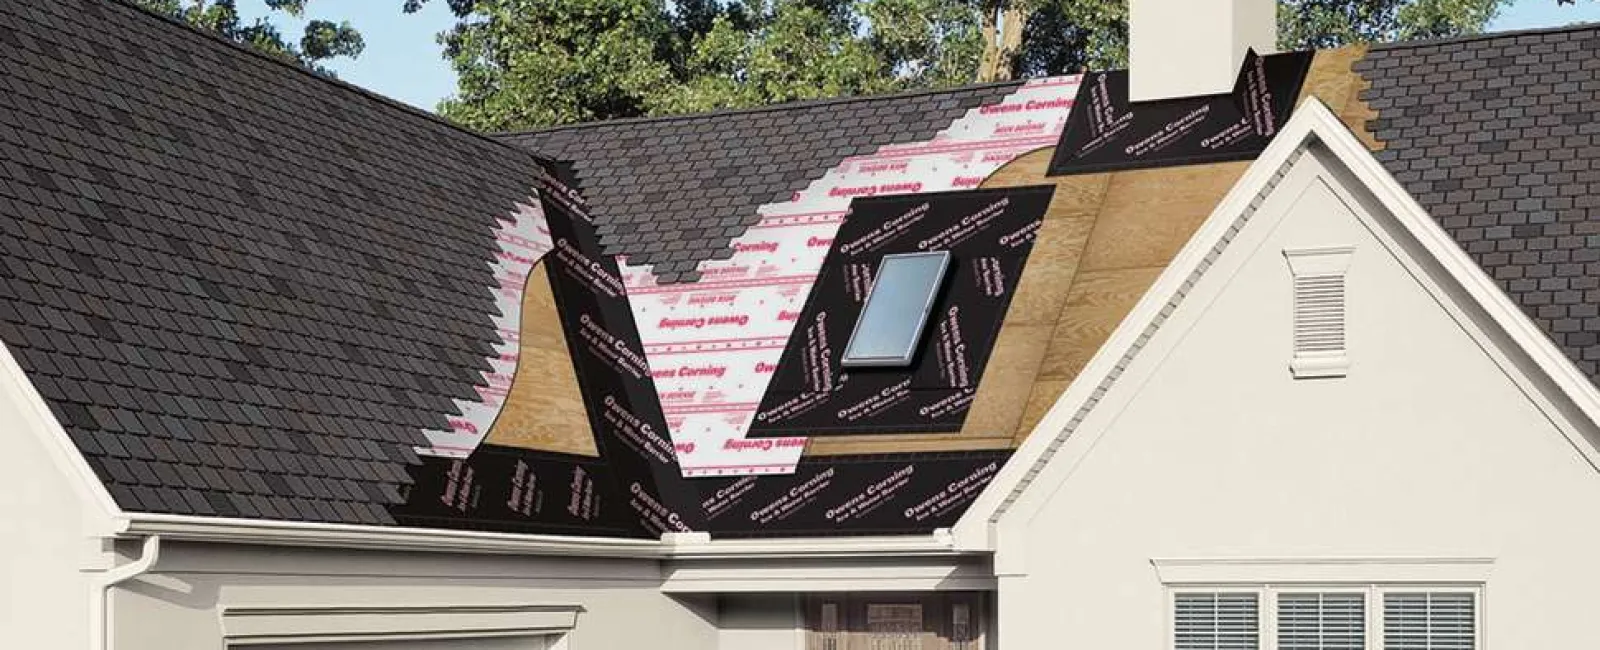
An ice and water barrier is a self-adhesive, waterproof membrane applied directly to the roof deck beneath the shingles, designed to prevent water infiltration caused by ice dams, wind-driven rain, and pooling moisture in vulnerable areas of the roof. Unlike standard roofing underlayment, an ice and water barrier self-seals around nail penetrations, creating a watertight bond that stops leaks before they reach the wood decking. Most building codes require this membrane at the eaves, extending at least 24 inches past the exterior wall line, and many roofing professionals also install it in valleys, around penetrations like chimneys and skylights, and along wall-to-roof intersections. Proper installation during a roof replacement is the only reliable opportunity to add this protection, since the membrane must be applied to a clean, bare deck.
What Is an Ice and Water Barrier?
An ice and water barrier (sometimes called ice and water shield) is a rubberized asphalt membrane with a peel-and-stick adhesive backing. It bonds directly to the roof deck, creating a continuous waterproof layer in the areas most prone to leaks. The key feature that separates it from synthetic or felt underlayment is its ability to seal around fasteners. Every time a nail or screw passes through the membrane, the rubberized material contracts around the shank, closing the hole and eliminating a potential entry point for water.
This matters more than most homeowners realize. Standard underlayment provides water resistance, but it does not seal around nails. If water migrates beneath the shingles due to wind, ice backup, or another mechanism, it can flow right through those fastener holes and into the roof deck. An ice-and-water barrier removes that risk entirely.
The membrane is typically sold in rolls 3 feet wide and comes in various thicknesses and grades, depending on the manufacturer and intended application. Some versions are designed specifically for high-heat areas around chimneys and exhaust vents, while others are formulated for cold-weather installation so the adhesive bonds properly in lower temperatures.
How Ice Dams Form and Why They Cause Damage
Ice dams are one of the primary reasons ice and water barriers exist, and understanding how they form helps explain why this membrane is so critical for homes in colder climates.
The process starts when heat escapes from the living space into the attic. That warmth raises the roof deck temperature, melting snow on the upper portions of the roof. The melted water runs down the slope toward the eaves, which are colder because they extend beyond the heated footprint of the house. When the water reaches this colder section, it refreezes, forming an ice ridge along the edge. As more snow melts above, water pools behind the growing ice ridge with nowhere to go.
That standing water eventually works its way beneath the shingle edges and into the roof deck. Without an ice-and-water barrier in place, water passes through nail holes in the underlayment and soaks into the plywood or OSB sheathing. Over time, this leads to rotted decking, damaged fascia boards, mold growth in the attic, and water stains on interior ceilings and walls. The repair costs from a single bad ice-dam season can easily run into the thousands of dollars.
An ice-and-water barrier at the eaves serves as the last line of defense. Even when water pools behind an ice dam and gets under the shingles, the sealed membrane stops it from reaching the wood below.
Where Ice and Water Barriers Should Be Installed
While building codes set minimum requirements, experienced roofing contractors know that strategic placement of ice and water barrier goes beyond just checking a box for the building inspector. Here are the critical areas where this membrane provides the most protection.
Eaves and Overhangs
The eaves are the most code-specified location for installing ice and water barriers. The International Residential Code (IRC) requires the membrane to extend from the lowest edge of the roof to a point at least 24 inches past the plane of the exterior wall. Because most homes have a soffit overhang of about 12 inches, a single three-foot roll may fall short of the 24-inch interior mark, that is why many professional roofers install two rows, providing coverage up to roughly six feet from the edge to guarantee code compliance regardless of the home's specific dimensions.
Roof Valleys
Valleys collect water from two converging roof planes, which means they handle significantly more water volume than any other section of the roof. This concentrated flow makes valleys especially vulnerable to leaks, particularly during heavy rainstorms or rapid snowmelt. Installing ice and water barrier along the full length of every valley is standard practice among quality-focused contractors, even in climates where ice dams are not a concern.
Penetrations and Flashings
Any opening cut into the roof deck creates a potential leak point. Chimneys, skylights, plumbing vents, and exhaust fans all require flashing to direct water around them, but flashing alone is not always enough. Applying ice and water barrier beneath the flashing and around the perimeter of these penetrations adds a redundant waterproof layer that catches anything the flashing misses.
Wall-to-Roof Intersections
Where a vertical wall meets aslopedg rooe, step flashing is used to direct water away from the joint. These transitions are particularly vulnerable because debris can accumulate in the crease, water can wick behind siding, and flashing can shift over time. An ice-and-water barrier at these intersections provides a reliable backup.
Full Roof Deck Coverage
In regions with severe winter weather or on low-slope roof sections (anything below a 4/12 pitch), some contractors recommend covering the entire roof deck with an ice-and-water barrier. While this approach costs more, it provides maximum protection. If shingles are lost during a storm, a fully covered deck remains waterproof until repairs are made.
Ice and Water Barrier vs. Synthetic Underlayment
One common point of confusion for homeowners is the difference between the ice and water barrier and the synthetic underlayment that covers the rest of the roof deck. They serve complementary but distinct purposes.
Synthetic underlayment is a lightweight, water-resistant material that provides a secondary drainage plane across the entire roof surface. It sheds water that gets beneath the shingles, but it does not seal around nails, and it is not waterproof in a standing-water scenario. Think of it as a raincoat: great at shedding water that flows over it, but not designed to hold up if submerged.
Ice and water barrier, by contrast, is fully waterproof and self-sealing. It handles the worst-case situations where water is not just flowing over the surface but is being forced under pressure into nail holes and seams. The tradeoff is that because the membrane is a vapor barrier, covering the entire deck can trap moisture and reduce the roof's ability to dry out. That is why most installations use an ice-and-water barrier only in high-risk areas and synthetic underlayment everywhere else.
The best-performing roof systems use both materials strategically, placing ice and water barrier at the eaves, in valleys, around penetrations, and at wall intersections, with synthetic underlayment covering the remaining field of the roof.
Building Code Requirements You Should Know
Building codes across the United States vary by jurisdiction, but the IRC provides the baseline that most states adopt and modify. The general rule is that any area with a documented history of ice forming along the eaves requires an ice barrier. The membrane must extend from the lowest roof edge to at least 24 inches inside the exterior wall line.
Some states and municipalities go further. Cold-climate regions often require an ice-and-water barrier in valleys and around penetrations, in addition to eaves. A few jurisdictions also mandate coverage on low-slope sections regardless of climate zone.
It is worth noting that code compliance is not just about passing inspection. Insurance companies in many states may deny claims for interior water damage caused by ice dams if the roof does not meet current code requirements for installing an ice and water barrier. This makes the membrane both a structural safeguard and a financial one.
The Role of Ventilation and Insulation
An ice and water barrier is a critical component of roof protection, but it works best as part of a larger system that includes proper attic ventilation and insulation. These three elements work together to reduce the conditions that cause ice dams in the first place.
Adequate attic insulation prevents heat from the living space from migrating into the attic, reducing the temperature differential that triggers snowmelt. Balanced ventilation, with intake vents at the soffits and exhaust vents at the ridge, allows any warm air that does enter the attic to escape before it can heat the roof deck. When insulation and ventilation are working properly, the roof surface stays cold enough to prevent uneven melting, reducing the likelihood of ice dams.
Even with perfect ventilation and insulation, though, extreme weather can still create conditions for ice dams and wind-driven rain. That is exactly why an ice-and-water barrier exists. It is the failsafe that protects your home when everything else is overwhelmed.
When to Install an Ice and Water Barrier
Because the membrane must be applied directly to a clean roof deck, installation can only happen when the shingles are off. This makes a full roof replacement the ideal time to add or upgrade ice-and-water barrier protection. It cannot be retrofitted over existing shingles, and attempting to patch it in during a minor repair is not practical or effective.
If you are planning a roof replacement, ask your contractor specifically about their ice and water barrier plan. A quality roofing professional will be transparent about where the membrane is going, how many rows are being installed at the eaves, and whether valleys and penetrations are included. The material cost is relatively modest compared to the overall price of a new roof, and the protection it provides is substantial.
Skipping the ice and water barrier to save a few hundred dollars on a roof replacement is one of the most costly shortcuts a homeowner can make. The membrane is invisible once the shingles are installed, which makes it easy to overlook, but it is doing critical work every single day your roof faces the elements.


